|
The only reason we did this write up is
because we had to remove a stock MR vortex generator when installing a
new Tyrant performance carbon fiber vortex. Tools used for this were a
hair dryer, spatula, glass cleaner and paper towel.
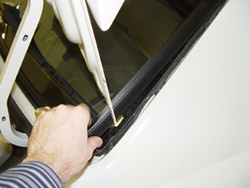 |
1. You will want to
unclip the body trim that runs from the roof line to the bottom
of the trunk. We suggest popping the trunk, and starting there
and working your way up the roof line. You will need to do this
on the drivers and passenger side of the EVO.
Tech Tip: Be very
careful when removing these, they take a little pressure to
unclip them. |
| |
|
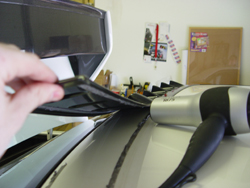 |
2. Starting on the
passenger side, we heated up the vortex with the hair dryer for
approx. 2-3 minutes. This allows the double side tape to easily
remove from the car. The longer you heat it up, the easier it is
to remove. To get the peeling process started, we used a spatula
to lift the vortex from the car.
Tech Tip: We did this in
sections, fin to fin. Heat it up and then peel off. Once you get
half way down the car, it is easily removes from there.
|
| |
|
| |
|
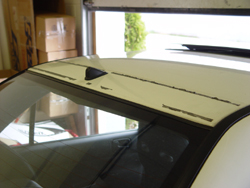 |
3. Using a combination
of the hair dryer + elbow grease helped us remove the remaining
double sided tape that was left from the old vortex. |
| |
|
| |
|
|

 Want
to buy this part? Read More>>
Want
to buy this part? Read More>> Did
You Enjoy Reading This Article? Read More>>
Did
You Enjoy Reading This Article? Read More>> Become
A Member Today! Access To More Articles>>
Become
A Member Today! Access To More Articles>>