|
Thanks to the folks at Perrin
performance, you can finally get rid of that pesky check engine light in
your EVO8.
1.) Apply parking
brake, and disconnect the battery.
2.) Remove the
shift knob.
3.) Remove the
center console.
-(2) screws under
ashtray
-(2) screws at rear of
console
-(2) Covers at both
sides of forward portion of console. Then remove the screw revealed
under each cover. Lift and remove console.
4.) Locate the
shifter box. Just to the right is a smooth gloss black wire harness
shield. (Note: This is not the ribbed wire loom!) inside are the wires
leading from rear 02 sensor to the ECU.
5.) Using
suitable tool split shielding lengthwise. Note: DO NOT CUT wires!!
Inside the shielding you
will find:
- (1) Red wire with
yellow stripe
- (1) Blue wire with
yellow stripe
- (1) shielded wire.
6.)
As in step (5) split shielding using suitable tool to expose two
additional wires inside shielded wire:
-(1) white wire
-(1) Black Wire
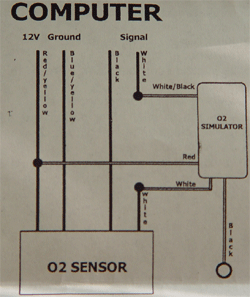
7.) Connect wires from the 02 simulator to vehicle as follows
(see diagram for details)
-Red wire from simulator
connects to red wire with yellow stripe.
- Black wire with the
ring terminal on the simulator needs to be connected to a good body
ground.
- Cut white white on
vehicle. Using supplied connectors; connect the white wire on the
simulator to the side of the wire leading toward the rear of the vehicle
(towards the actual o2 sensor). Connect the white wire with the black
stripe on the simulator to the white vehicle wire leading toward the
front of vehicle. (note: only cut white wire! connect end with supplied
connectors or solder. Be sure to solder and insulate connection to red
wire! if any other wires are cut the simulator will NOT work!)
8.) Reconnect the
battery.
9.)
Turn ignition key to the on position. If the red LED on simulator
illuminates and blinks, wiring is correct. Remove the ignition key.
10.)
Secure simulator away from the interface using the supplied wire
ties.
11.) Install
console in reverse order
12.) Re-install
shift knob
|

 Want
to buy this part? Read More>>
Want
to buy this part? Read More>> Did
You Enjoy Reading This Article? Read More>>
Did
You Enjoy Reading This Article? Read More>> Become
A Member Today! Access To More Articles>>
Become
A Member Today! Access To More Articles>>